
Prom Dress 2025
My daughter just went to her first Prom. The last time I made her a fancy dress, I told her I only wanted to make a dress like that once a year, so she could choose Homecoming or Prom, and if she wanted me to make a formal dress for two occasions, she could pay for the fabric for the second. She agreed, and so this last Homecoming she ended up finding a dress off of Facebook Marketplace and that worked out well.
For this Prom, we started planning back in February so we would have enough time to order fabric and have it arrive from China. My daughter knew she wanted to have a dress inspired by the night sky, so we had that in mind while looking at fabric. It took some time to narrow down both the fabric we wanted and also a pattern. Etsy is full of AI patterns these days, so we kept finding impressive looking patterns that were suspicious on a closer look.


We ultimately decided on the Vespertine Dress pattern by Gunnar Deatherage (a contestant on Project Runway). It has puffy sleeves as an option, but my daughter wanted something even puffier and more of a statement. We found those in the Aly Dress by BerrysPatterns.


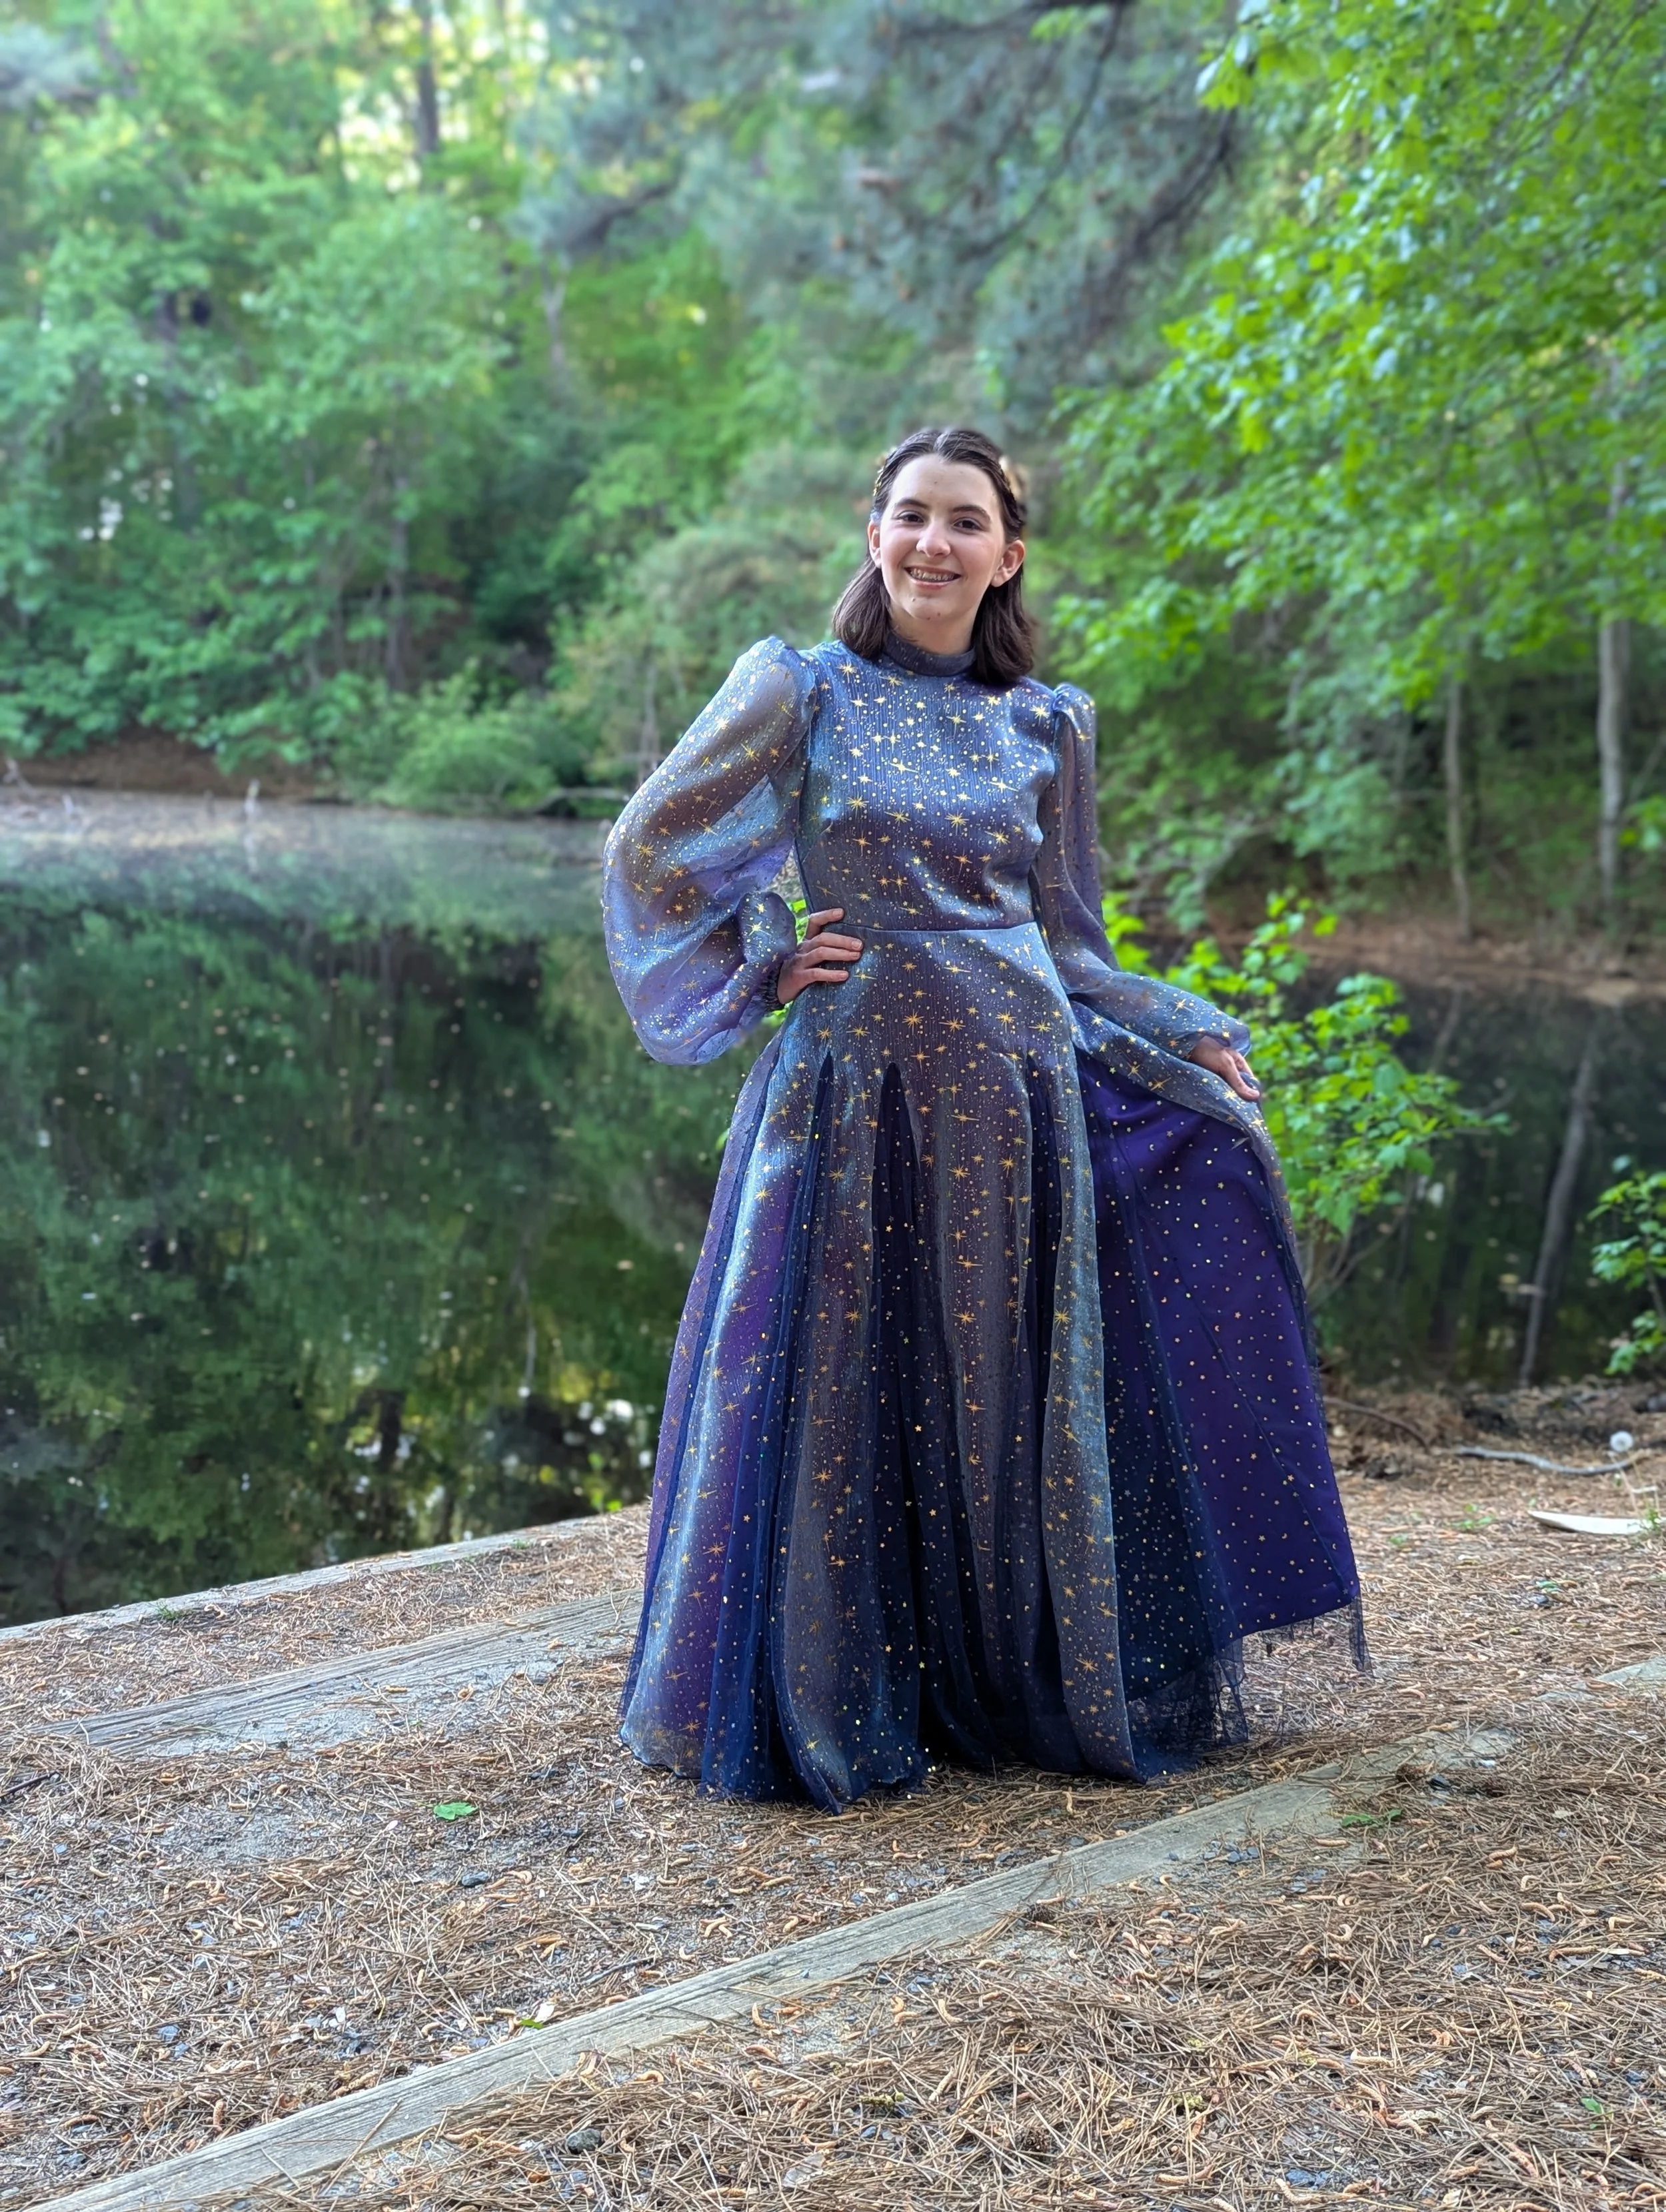
The fabric arrived at the end of March. We bought some purplish-blue organza that was see-through and had gold stars. I had so many doubts about this. We couldn’t really tell the color exactly online, which makes sense because it is different colors in different lighting. We banked on the fact that if we put it on top of dark purple fabric, it would look purple. My daughter picked some navy blue tulle with stars for the accent fabric. I was so hesitant about this; I did not think they would coordinate. But she really wanted it! When it arrived, I was still hesitant looking at the photo on the left, but when I unfolded them and placed them on top of some purple satin, I felt much better about this combination.
My first step was to buy a dress form. Last time I made her a formal dress, I borrowed my mother-in-law’s, and it was invaluable. While I’m sure she would have loaned it again, I had another formal dress I need to hem for a friend, and no time to get my MIL’s, so I made the decision to just buy my own, and then I could have one on hand and keep it in the basement when I’m not using it.
I made a test bodice. Before I even did that step, I removed 1.5” of height from the bodice, 1” above the bust and .5” under. That meant redrawing the armscye. I made the test bodice, and was a little dismayed how poorly it fit. There’s always an element of uncertainty for me in using digital patterns from a new-to-me pattern maker. How will it fit? Patterns are made for a standard body with standard measurements, but very few people fit the standard, so adjustments are expected. When I have to make a ton of fitting adjustments like this, I definitely go through some doubt in my head of “Is this a pattern issue, or just my unique body?” Or my daughter’s body, in this case.
I ended up taking another 1/2” of height from above the bust, sloping the shoulder slope by 1/2”, adding an extra 1/2” to the back center bodice piece (so 1” of width total), shortening the bust darts, and lowering the apex. After all that adjustment, I was shocked when it seemed to fit perfectly on the second test bodice. Oh, and I increased the length of the collar, but ended up taking length back out later, so I think that was just from skimming the instructions and sewing it in wrong. (Also took 4” from the bottom of the skirt. She’s only 5’1”.)
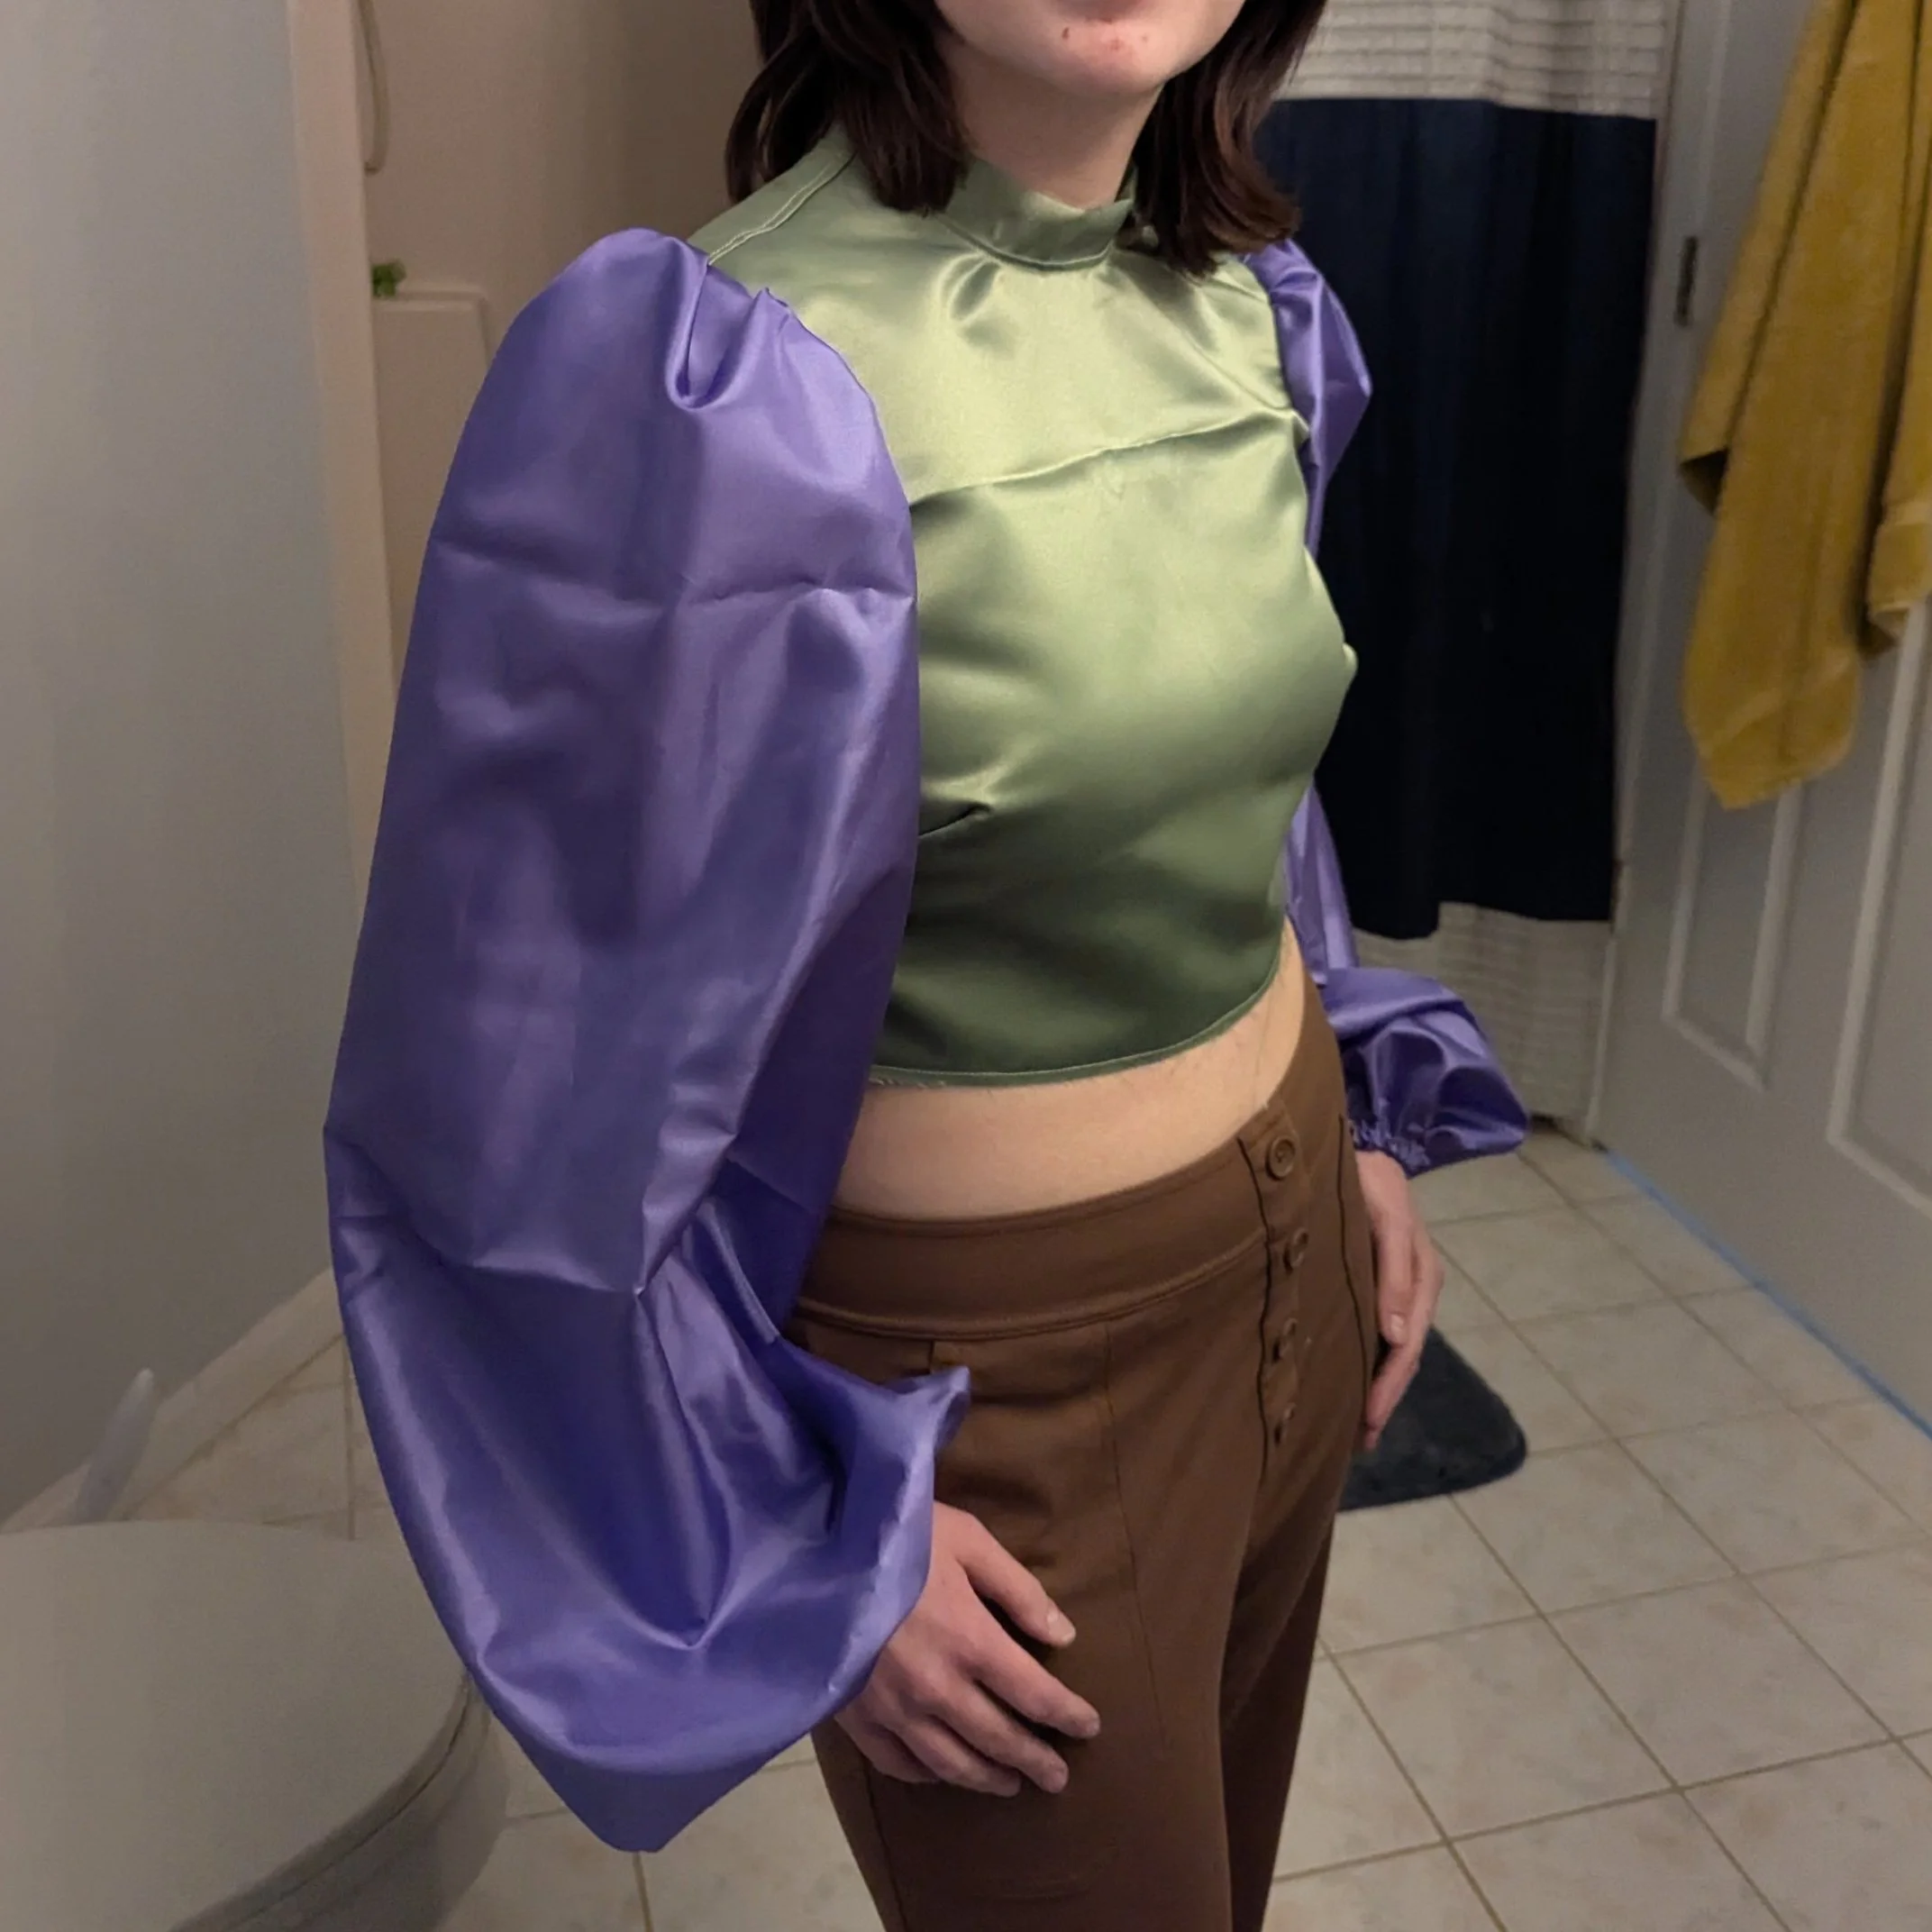
For this version I added in test sleeves. I did subtract 2” from the length of the sleeves, and increased the amount of the sleeve cap being gathered in order to fit the armscye.
This is where it was left for awhile. I had to get ready for our big Spring Break trip to Luray, Virginia, and I didn’t want to leave the dress partially done. That meant I ended up doing all the sewing in a week after getting home.


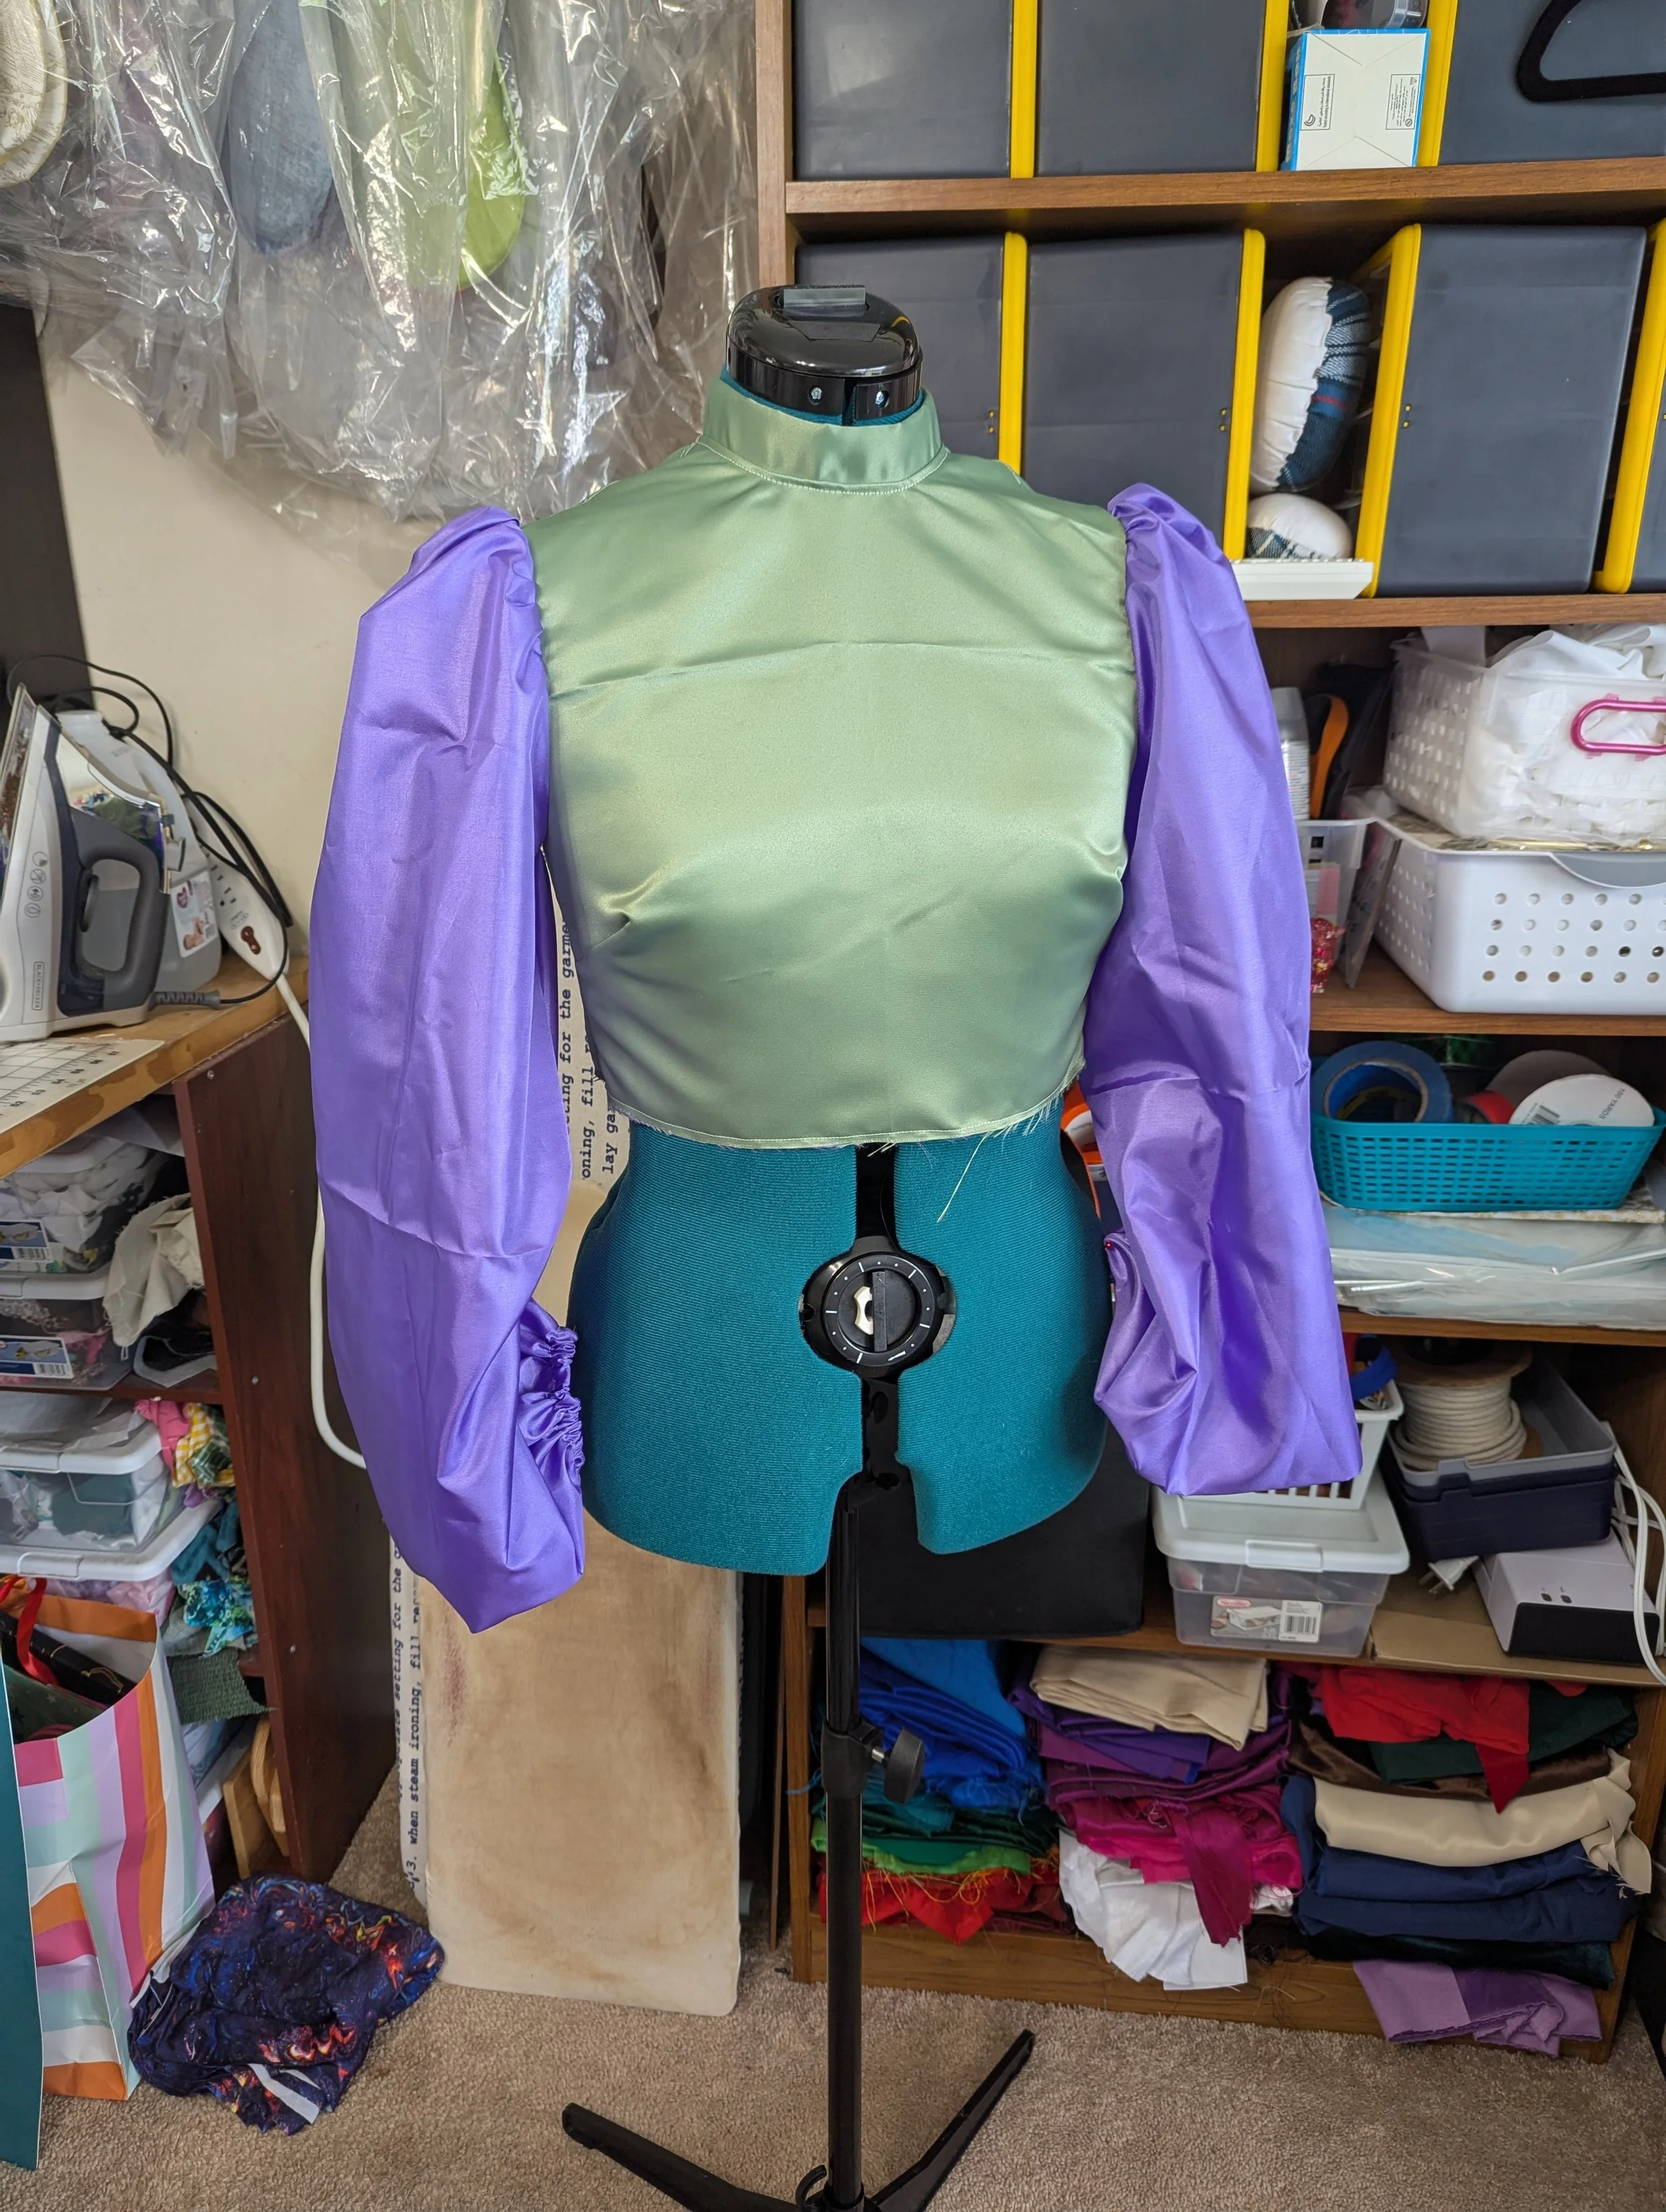
The final issue I had to solve was how to make the pattern fit on my fabric. Because the skirt is so wide, the pattern has you fold you fabric horizontally instead of vertically. This would normally work, but her organza had a subtle vertical stripe pattern. We discussed it and decided to just narrow the skirt. I did this by cutting along the godet lines, all the way up to the waist, and pivoting the fabric to shrink it. I wondered how this would affect the final fit. I had already shortened the skirt by 4”, and it made the most sense to just cut it off the bottom rather than mess with the godet lines. Now I was also removing 4” from each godet. That ended up with 32” less of skirt circumference. I tried the lining with the test bodice (and had to repeatedly tell people that these weren’t the final fabrics, because even when I would say that, they would look at the green bodice with purple sleeves, be confused, and I’d have to tell them again.) My daughter and I decided it still had plenty of swing, plus adding the godets would definitely increase the skirt volume.


There were also so many little things that I had to be concerned about. For instance, organza frays, but tulle does not. How to hem the skirt? I ultimately did a narrow rolled hem on my serger all the way around the overlay fabric before I cut the godets. Then I sewed in the tulle. Next, the pattern suggested doubling up on the triangle fabric that makes up the godets. I was concerned about that and if it would affect the sewing instructions. So I made a little test skirt. You can see how much better it looks with double the tulle! It did give me some headaches when sewing later. Not all of the pattern instructions were clear, and this was one of them. Nobody is looking closely enough at the dress to notice the mistakes except me, but I can tell you that not all my points look good!


At this point I was starting to be concerned about finishing. I thought I would get more things done earlier in the week, but I was tired from vacation, struggled to stay on task, and had several kid appointments. I did most of the skirt sewing on Thursday, which left Friday to sew the bodice, sleeves, collar, connect the bodice and skirt, and sew in the zipper. I have a few close-ups of the inside of the collar and the sleeves. I was particularly proud of sewing those, because the fabric was so fiddly and thin. To make the casing on the bottom of each sleeves, I basically sewed binding made out of the dress fabric onto the sleeve, then added elastic. It turned out perfectly.


It all came together nicely though, and I finished Friday evening, save for the two little hooks and eyes that I put in on the collar on Saturday because I was so tired on Friday.
After I put it on her, I realized that the hem, which I had meticulously measured out, was actually going to touch the ground in a few places instead of ending an inch above the ground like I intended. As handy as a dress form is, and even with adjusting it to fit her height with shoes, a dress doesn’t lay on a body the same way. Unfortunately, because of how I did the rolled hem before sewing the godets, it just wouldn’t work to re-hem it. I had to take a deep breath, put it aside, and reminded her to lift the front while walking!
Saturday was the big day! My younger daughter helped with makeup and I did her hair. I had bought some fun hair accessories to match the theme. We also bought a belt to go along with it but that didn’t come in time.
Her boyfriend wasn’t able to make it, but thankfully my daughter had no problems going by herself and hanging with friends. We discussed places near us to take photos and picked this beautiful park. Oh, and one thing I forgot to mention was that the Prom theme ended up being Galaxy Gala! We had already picked out the dress fabric before we knew that, but it made it even more perfect.


Now for the final breakdown of price! I did this for her Homecoming Dress, and I think people find it interesting to see how much a custom formal dress costs.
The two dress patterns together were $24.37
6 yards of organza and 14 yards of tulle- $89.72, including shipping. This price is amazing. We picked really cheap fabrics!
4 yards of satin and 4 yards of satin lining- $40.91, including shipping
Invisible zipper- $1.50 from Joann Fabrics (snagged the last purple zipper)
Altogether, the total cost was $156.50. I actually ended up with quite a bit of extra fabric. I tried to do my best to order using the pattern recommendations, but with the amount we removed for her height, and with narrowing the skirt to cut in along the grain instead of perpendicular, I had extra. I had 3 yards extra of the organza, 5 of the tulle, and about 1.5 yards extra of each of the purple satins.
I’m really happy with the final result! And more importantly, my daughter loved it!